
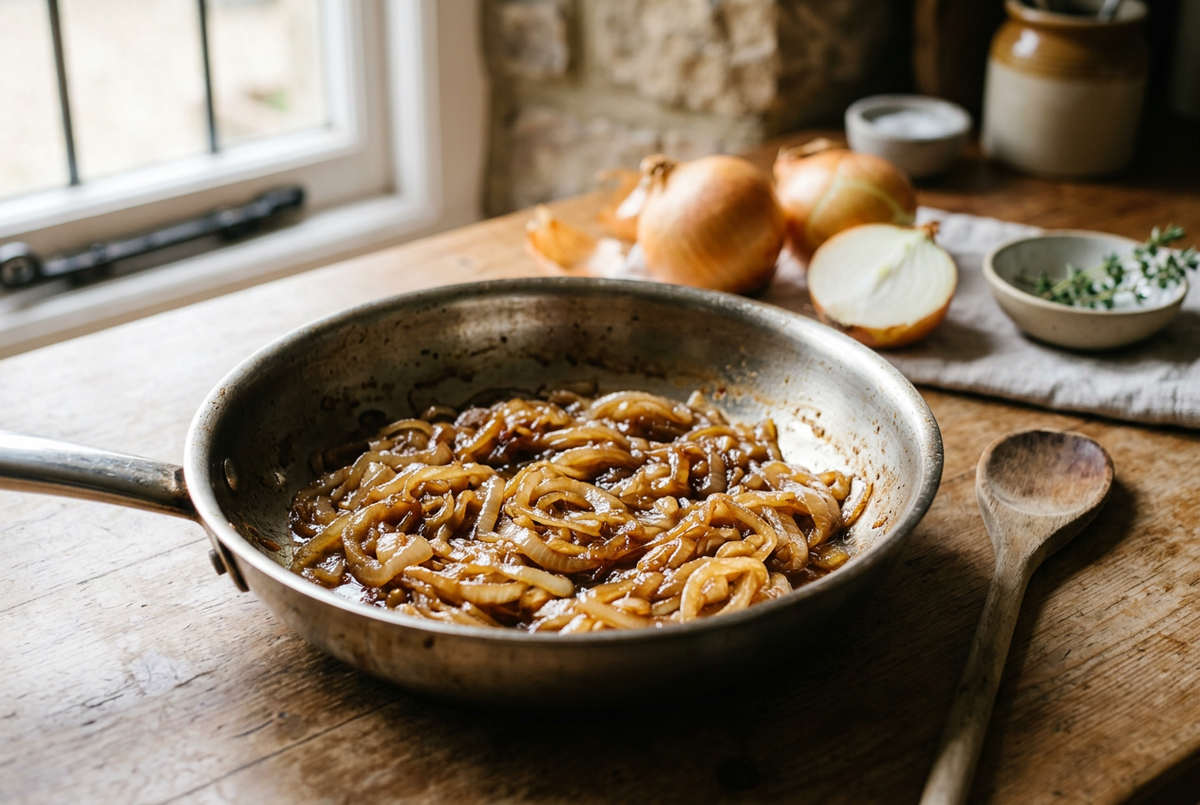
Knowing how to caramelise onions without burning them is one of those small kitchen skills that makes ordinary meals feel more considered. A handful of everyday onions can become a soft, richly flavoured topping for toast, a savoury layer in a sandwich or the starting point for a comforting sauce. You do not need complicated ingredients, but you do need to understand what is happening in the pan.
The most common mistake is expecting deep caramelised flavour at the same speed as a quick stir-fry. Onions need time to release moisture, soften and gradually develop colour. Turn the heat too high and their edges can scorch before the centres become tender. Keep the heat controlled, pay attention to the colour and add a little water when necessary, and the process becomes much easier to manage.
This guide explains how to caramelise onions in a frying pan, how long the process can take, whether you need sugar and what to do when onions start sticking. It also includes a flexible recipe, troubleshooting advice and practical ideas for using the finished onions.
What are caramelised onions?
Caramelised onions are onions cooked slowly until their texture becomes very soft and their colour changes from pale white or purple to golden brown or deeper brown. As moisture evaporates, their flavour becomes more concentrated and their sharp raw character gives way to a sweeter, rounder taste. Several browning processes contribute to the finished flavour, so the everyday cooking term describes the result more neatly than the full chemistry.
They are different from onions that have simply been softened for a sauce. Softened onions are usually pale and still contain plenty of moisture. They are also different from quickly fried onions with dark edges and a firmer centre. Both can be delicious, but neither gives quite the same jammy texture and balanced sweetness as a patient, slower cook.
There is no single compulsory finishing colour. Light golden onions can suit a delicate tart, while deeper brown onions work well with mushrooms, burgers and rich sauces. The important distinction is between developed brown colour and bitter blackened patches.
How long does it take to caramelise onions properly?
For a typical home batch, allow around 40 to 60 minutes of cooking, and sometimes longer. Treat that as a planning range rather than a promise. The quantity of onions, their water content, the width of your pan and the strength of your hob all affect the time. A large batch in a relatively narrow pan may take considerably longer because more water has to evaporate.
Onions that look golden after ten minutes might be lightly browned rather than deeply caramelised. That can be useful for a quick meal, but it is a different result. If a recipe needs genuinely soft, concentrated onions, build in enough time instead of trying to force the process with aggressive heat.
Use your senses alongside the clock. Look for a gradually deepening colour, a texture that yields easily under the spoon and a smell that is savoury and sweet rather than acrid. If the pan starts smoking or the onions darken rapidly in isolated spots, reduce the heat immediately.
Which onions are best for caramelising?
Ordinary brown or yellow onions are a dependable starting point. They are widely available, affordable and develop a good balance of sweetness and savoury flavour. You do not need a special variety to make this technique worthwhile.
Red onions also work. Their colour changes as they cook, and they can be particularly appealing in sandwiches, tarts and vegetable dishes. White onions can be used too, although their flavour and water content may give a slightly different result. Sweet onion varieties can taste very sweet when reduced, which may or may not suit the meal you are making.
For your first attempt, choose onions of roughly similar size and use one variety throughout the batch. This makes it easier to slice them consistently and judge their progress. Once you understand the method, mixing varieties is a straightforward way to explore different flavours.
What is the best pan for caramelised onions?
A wide frying pan or sauté pan gives moisture room to escape. That matters because onions need to lose water before they can brown effectively. A pan with a reasonably substantial base can also make heat easier to control, although you still need to watch for hotter areas on your own hob.
Stainless steel is a useful option because the light cooking surface makes developing colour easy to see. It can also collect a brown layer of concentrated cooking juices, often called fond, which you can loosen with a splash of water. If you are comparing everyday cookware, explore Culivra’s 304 Stainless Steel Frying Pan and choose a size that leaves room for your usual batch.
A non-stick pan can work too, particularly if you prefer easier release, but follow its care instructions and avoid excessive heat. You do not need to buy a new pan just to try the method. Start with a suitable pan you already own, use a moderate quantity of onions and learn how that combination behaves.
For more general technique advice before you begin, read our guide to cooking with stainless steel without food sticking. The goal here is controlled, gradual cooking rather than a very hot sear.
How to slice onions for even caramelising
Peel the onions, halve them through the root and remove the tough root ends. Place each half flat-side down on a stable chopping board, then cut into fairly even slices. Aim for slices around 3 to 5 millimetres thick as a practical starting point. They should be thin enough to soften comfortably, without becoming fragile shreds.
Consistency matters more than achieving an exact measurement. If some pieces are paper-thin while others are chunky wedges, the thin pieces may scorch while the larger ones are still firm. Take a little extra care at this stage and the cooking will be easier to manage.
Slicing from root towards tip tends to produce strands that hold their shape well. Slicing across the onion gives a different shape and is also perfectly usable. Choose the style that suits your finished dish, but keep the pieces reasonably uniform within the batch.
Easy caramelised onions recipe for beginners
This flexible recipe starts with three medium brown onions and makes a modest batch. The finished volume will be much smaller than the pile of raw slices, so do not be surprised when a full-looking pan reduces substantially.
Ingredients
- 3 medium brown onions, peeled and evenly sliced
- 1 to 2 tablespoons olive oil, or a mixture of oil and a little butter
- A small pinch of salt, adjusted to taste
- Water, added a tablespoon or two at a time as needed
- Optional: a little black pepper or fresh thyme near the end
Butter adds flavour, while oil is a straightforward option on its own. Neither makes the onions immune to burning. The useful habit is to match the heat to what you see happening, not to rely on the fat to protect an unattended pan.
Step 1: Warm the pan gently
Put the pan over a medium-low heat and add your chosen fat. Let it warm without smoking. If you are using butter, allow it to melt gently rather than turning dark before the onions are added. You want enough heat to start softening the onions, not an intense blast that browns their edges immediately.
Step 2: Add the onions and a small pinch of salt
Add the sliced onions and stir to coat them. They may initially form a loose mound, but you should still be able to turn them comfortably. If your pan feels awkwardly overloaded, divide the batch between two pans or cook less at once.
Salt seasons the onions and can encourage moisture to come out. Start with a modest amount because the onions will reduce, and you can adjust the seasoning later. Stir the slices so the pieces at the bottom do not receive all the heat while the top remains untouched.
Step 3: Let the onions soften before chasing colour
During the first stage, the onions become softer and more translucent. You may see steam and liquid collecting in the pan. This is normal. Keep cooking gently, stirring regularly and moving the slices from the edges towards the centre.
Do not judge this stage as a failure because the onions are still pale. Water needs to leave before deeper browning can develop. If the onions are sizzling fiercely and darkening while still stiff, lower the heat. If almost nothing is happening for a prolonged period, increase it slightly rather than making a large adjustment.
Step 4: Cook slowly as the colour develops
As the onions reduce, spread them across the pan and continue cooking. Stir every few minutes at first, then more frequently as they become drier and more deeply coloured. Different pans and hobs behave differently, so stay close enough to respond.
Scrape up any golden brown deposits with your spoon and fold them back into the onions. Rotate the pan if your hob creates an obvious hot spot and doing so is safe. If one area colours faster than the rest, redistribute the onions rather than leaving that patch in place.
Step 5: Add a little water if the pan gets too dry
When the onions begin sticking firmly or the brown layer on the base becomes pronounced, add a small splash of water. It will produce steam, so keep your face and hands away from the rising vapour. Gently scrape the base to release the brown bits, then stir them through the onions.
Let that small amount of water evaporate before deciding whether you need more. You are not trying to boil the onions in a pool of liquid. Repeated small additions give you control and help prevent the concentrated juices from turning black.
Step 6: Stop at the colour and texture you want
The onions are ready when they are very soft, evenly golden to brown and pleasantly sweet and savoury. Taste carefully after allowing a small spoonful to cool. Add pepper, herbs or a little more salt if needed.
Remove them from the hot pan when they reach your preferred stage, especially if the pan retains heat well. Leaving a finished batch sitting over a warm cooking zone can take it from rich brown to scorched while you prepare the rest of dinner.
Do you need sugar to caramelise onions?
No added sugar is necessary for the basic method. Onions already contain sugars, and slow cooking develops sweetness as their moisture reduces. For a beginner, leaving sugar out also makes the process easier to understand because you can judge the onions themselves.
Some recipes deliberately add sugar to create a sweeter condiment or encourage faster surface colour. That is a recipe choice, not an essential step. Added sugar can brown quickly and may disguise onions that are still firm inside, so it is not a reliable substitute for time.
The same applies to balsamic vinegar. A small amount near the end can add an enjoyable sweet-sharp flavour, but it changes the finished result. First learn the plain method; then add extra flavours when they suit the dish.
Why are my onions burning instead of caramelising?
The usual cause is too much heat for the amount of moisture left in the pan. Early in cooking, the onions release water that helps buffer the heat. Later, once they are much drier, the same hob setting can become too aggressive. Adjust down as the batch reduces rather than assuming one setting will work throughout.
Uneven slicing is another frequent problem. Very thin pieces and loose fragments can burn before thicker slices soften. A pan that is too small, an unevenly heated base or long gaps between stirring can also create patches that colour much faster than the rest.
If the onions are catching but still smell pleasant, lower the heat and add a little water. If there are black fragments with a distinctly burnt smell, avoid scraping those fragments into the whole batch. Transfer unburnt onions to a clean pan if practical. A splash of liquid cannot remove an established bitter burnt flavour.
Why are my caramelised onions watery or not browning?
A crowded pan, a tight lid or a very low temperature can keep too much moisture around the onions. If they are sitting in liquid, first allow more time for evaporation. Cook uncovered during the browning stage and check whether the pan is wide enough for the quantity.
A lid can help soften onions early in some methods, but it is not needed for this recipe. Leaving it on traps steam and slows the move towards browning. If you started covered, remove the lid carefully and let the moisture escape.
Raise the heat a little if necessary, but watch closely. The point when the last visible liquid evaporates can arrive suddenly, and onions that seemed to be doing very little can start sticking quickly. Be ready to reduce the heat again.
Should you keep stirring caramelised onions?
You do not need to stir continuously from the first minute, but you should stir regularly and stay attentive. Brief contact with the pan helps colour develop. Leaving the onions untouched for too long, particularly late in cooking, increases the risk of uneven dark patches.
A useful rhythm is to stir, spread the onions back out, allow a little contact time and then check again. As they become softer and browner, shorten the gaps. If your pan has a hot spot, stir more often and move the onions through that area rather than allowing one portion to sit there.
A wooden spoon or an appropriate heat-resistant utensil helps you turn the onions and loosen the base. Follow your pan’s instructions when choosing utensils, especially if it has a coating.
Ways to use caramelised onions in everyday meals
One of the easiest uses is toast or an open sandwich. Add a thin layer of onions beneath cheese, mushrooms or roasted vegetables. Their concentrated flavour means you can start with a little and add more after tasting.
They also work well stirred into pasta, folded through mashed potatoes or added to a savoury tart. For a simple dinner, combine them with cooked beans and a splash of stock, then simmer briefly until the flavours come together. Season at the end, particularly if the beans or stock are already salty.
Use them as a flavour base for soup or as an addition to a sauce. Our guide to making pan sauce without wine explains another way to build flavour from what develops in a cooking pan. For a different weeknight direction, see how to make pasta sauce from scratch and experiment with a small spoonful of onions in a tomato-based sauce.
Because the onions are sweet, balance them with something savoury, fresh or gently acidic. A little mustard in a sandwich or fresh herbs over a finished dish can keep the overall meal from tasting heavy. Add strong ingredients gradually so they complement rather than overwhelm the onions.
Planning a batch without making cooking harder
Caramelised onions are a good task for a day when you are already spending time in the kitchen. Prepare the onions first, then organise the other components of your meal during the slower early stages, returning to the pan regularly. Avoid starting a batch when you need to leave the kitchen or rush out.
If you want a larger quantity, remember that doubling the onions does not guarantee the same cooking time. Two reasonably filled pans may be easier to manage than one tightly packed pan. Keep your first attempt modest so you can learn the technique without wasting ingredients.
If saving a portion for later, follow current local food-safety guidance for cooling, refrigeration, freezing and reheating cooked food. Do not leave a large warm batch sitting out while you forget about it. Portioning thoughtfully also makes it easier to use only what you need next time.
Frequently asked questions about caramelising onions
Can you caramelise onions without butter?
Yes. Olive oil or another suitable cooking oil can be used on its own. Butter is an optional flavour choice rather than a requirement. The central technique remains the same: moderate heat, regular stirring and small additions of water when the pan needs them.
Can you caramelise onions in a non-stick frying pan?
Yes, provided the pan is suitable for your hob and you follow its temperature and utensil guidance. You may see less brown residue forming on the base than with stainless steel, but the onions can still soften and develop colour. Avoid excessive heat to speed things up.
Can you use red onions instead of brown onions?
Yes. Red onions can be cooked using the same general method. Their appearance and sweetness will differ, so judge the texture and flavour rather than expecting them to look identical to brown onions. They can be especially useful in sandwiches and vegetable tarts.
Why do the onions shrink so much?
Raw onions contain plenty of water, and much of it evaporates during cooking. The remaining strands soften and pack together, which makes the finished batch look much smaller. This reduction is normal and is part of the reason their flavour becomes concentrated.
Can you make caramelised onions in fifteen minutes?
You can soften onions and give them some colour in a shorter cooking session, depending on the quantity and method. For deeply soft, evenly browned onions, however, allow substantially longer. If time is tight, aim honestly for lightly fried onions rather than burning them while chasing a slower-cooked result.
Should caramelised onions taste bitter?
They should taste pleasantly sweet and savoury, not harshly bitter. Bitter flavour can indicate that some of the onions or the residue on the pan has burnt. Prevent it by lowering the heat when needed, watching the drier later stages carefully and loosening brown deposits before they turn black.
The key to better caramelised onions
The most useful lesson is simple: follow what is happening in the pan rather than trying to force the clock. Slice consistently, choose a pan with enough room, let moisture evaporate and reduce the heat when the onions become drier. A splash of water is a practical control tool, not a sign that something has gone wrong.
Start with one small batch and aim for a soft texture and an even golden brown colour. Once you recognise the stages, it becomes much easier to adjust the method for your own pan and hob. Those patient minutes turn an everyday ingredient into something you can use across a whole range of meals, without needing a long shopping list or complicated equipment.

Leave a comment
This site is protected by hCaptcha and the hCaptcha Privacy Policy and Terms of Service apply.