
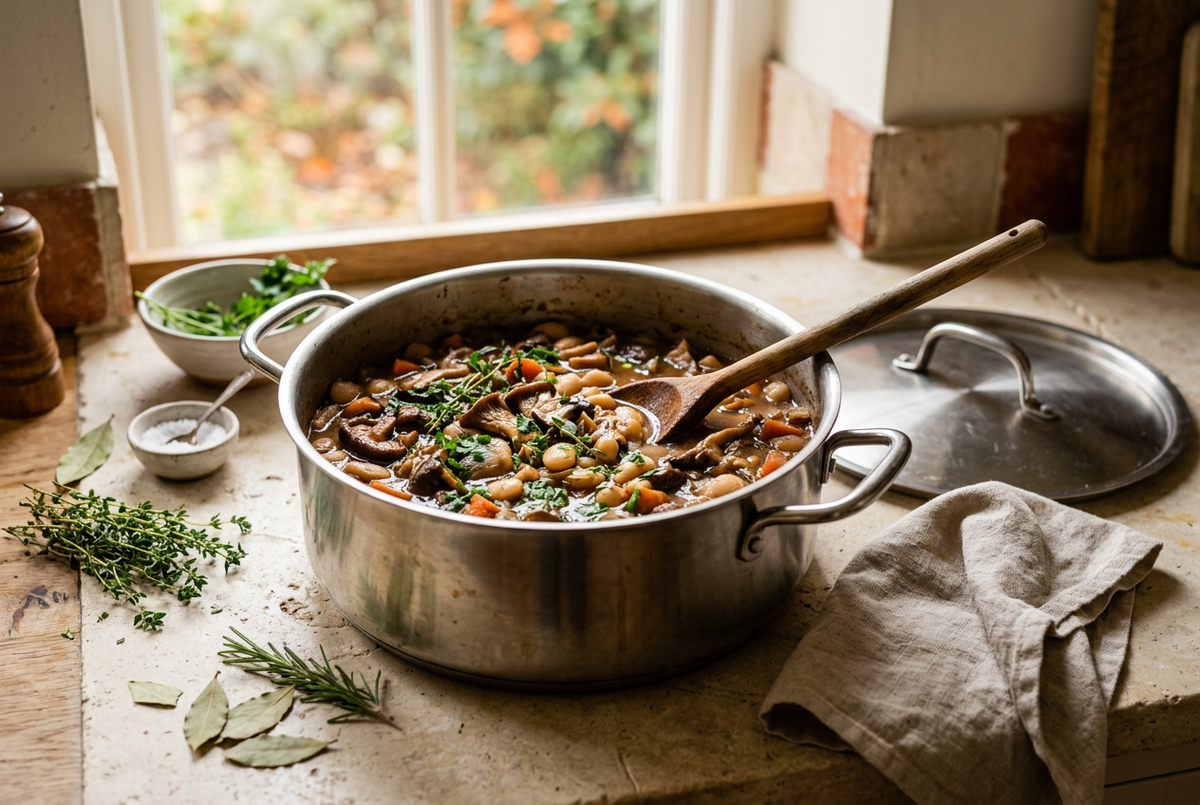
Learning how to braise is one of the most useful ways to make everyday cooking feel calmer and more rewarding. Instead of juggling several pans at the last minute, you build flavour in stages, add a little liquid and let gentle heat do much of the work. The result can be tender vegetables, richly flavoured beans or a comforting meat dish with a sauce worth saving every last spoonful of.
Braising is often associated with weekend cooking, but it does not have to mean an entire afternoon at the hob. A cabbage braise or a pan of mushrooms and butter beans can fit into an ordinary evening. Understanding the method matters more than choosing an elaborate recipe.
This guide explains what braising means, which cookware to use, how much liquid to add and how to avoid the mistakes that lead to watery sauces or uneven results. There is also a straightforward mushroom and butter bean recipe to help you put the technique into practice.
What is braising?
Braising is a cooking method that combines an initial stage of dry heat with a longer stage of gentle cooking in a modest amount of liquid. Ingredients are often browned first, although some delicate vegetable dishes skip that step. Stock, water, tomatoes or another suitable liquid is then added, and the food cooks slowly, usually with a lid on.
The defining feature is that the main ingredients are not completely submerged. Part of the food sits in the liquid while the covered pan traps steam above it. Together, the liquid and steam help the ingredients cook gently and develop a cohesive flavour.
The technique is flexible rather than rigid. A pot of chunky vegetables might need occasional turning, while a large piece of meat may need a much longer cooking time. What these dishes share is controlled heat, enough moisture to prevent drying out and time for the ingredients to soften.
Braising versus stewing: what is the difference?
In a stew, smaller pieces of food are generally surrounded by more liquid. A braise usually contains larger pieces and a shallower level of liquid. There is plenty of overlap in home cooking, so you do not need to worry about naming your dinner perfectly. The useful distinction is practical: a braise needs closer attention to liquid levels because the pan can become dry if too much moisture escapes.
If you enjoy dishes that build flavour in one pan, our guide to one-pot cooking explores more ways to simplify dinner without making every meal taste the same.
Why braising works so well
Braising gives you the benefits of two different cooking environments. Browning develops a savoury flavour on the surface of suitable ingredients. The slower, moist stage then softens the food and brings the sauce together. Neither stage needs to be complicated, but both benefit from a little attention.
With suitable cuts of meat, time and moisture help connective tissue soften. With vegetables, gentle cooking allows dense stems, layers and wedges to become tender without requiring aggressive heat. Beans absorb the character of the sauce, while mushrooms add a deep savouriness of their own.
This makes braising especially useful when you want to cook with familiar, accessible ingredients. Onions, carrots, cabbage, tinned beans and a little stock can become a satisfying meal when they are handled thoughtfully. Expensive ingredients are not a prerequisite for a good result.
Choosing the right pan for braising
Look for a pan with a stable base, enough depth for liquid and a well-fitting lid. A wide casserole pan can be useful because it gives ingredients space to brown before the liquid is added. A deeper pot can also work, although you may need to brown ingredients in more batches.
The ideal size depends on the amount you are cooking. An oversized pan encourages evaporation and can leave a small batch drying around the edges. A cramped pan makes browning difficult and can leave ingredients stacked in a way that cooks unevenly. Aim for a comfortable fit rather than squeezing everything into the smallest possible vessel.
If you plan to move the pan from hob to oven, check the manufacturer's instructions for the body, handles, lid and any knobs. Do not assume that a pan is oven-safe just because its main body is metal. Temperature limits and suitability can vary between components.
You can also braise entirely on the hob. In that case, choose a burner that suits the pan base and keep the heat low enough to maintain gentle bubbling. There is no need to buy specialist equipment before trying the method with cookware you already own.
The basic braising method, step by step
1. Prepare ingredients for even cooking
Cut vegetables into pieces that will soften at roughly the same rate. Dense carrots generally need smaller pieces than tender mushrooms. If you are cooking cabbage, keep a little of the core attached to each wedge so the layers hold together when you turn them.
Pat ingredients dry where appropriate before browning. Excess surface moisture has to evaporate before browning can begin, which can leave food steaming while you wait. Have your stock and aromatics ready too, so you are not chopping garlic while the pan becomes too hot.
2. Brown in manageable batches
Warm the pan over a moderate heat and add a suitable cooking oil. Arrange ingredients with some space between them, then give them time to develop colour before turning. Constant stirring is useful for some cooking methods, but it can prevent a good browned surface here.
Work in batches if necessary. This is especially helpful with mushrooms, which release moisture as they cook. Remove each browned batch to a plate and continue with the rest. Browning does not need to mean scorching: dark golden patches are useful, while blackened residue can make the sauce bitter.
3. Soften the aromatics
Reduce the heat slightly before adding onions, leeks or shallots. Let them soften, stirring to prevent catching. Add garlic later because it can burn more quickly. Spices and tomato purée can be stirred in briefly at this stage to distribute their flavour through the oil and vegetables.
The aim is to create a flavour base rather than rush straight to the liquid. Even a few extra minutes spent softening onions can make the finished sauce taste more rounded. If the base looks dry, add a small splash of water rather than allowing it to burn.
4. Deglaze the pan
Add a small amount of your chosen liquid and gently scrape up the browned bits with a utensil suitable for the pan surface. This is called deglazing. Those golden deposits contribute flavour to the sauce, provided they have not burnt.
Stock or water works well, and you do not need wine to make a good braise. If using wine, let it simmer briefly before adding the remaining liquid. Choose a liquid that complements the dish rather than relying on it to provide every element of flavour.
5. Add enough liquid, not too much
Return the main ingredients to the pan and add enough liquid to come partway up them. Roughly one-third to halfway up larger pieces can be a useful starting point, but the right amount depends on the pan, recipe and ingredients. Vegetables that release a lot of moisture may need less.
Bring the liquid to a gentle simmer, then cover and reduce the heat. Check occasionally rather than leaving the pan completely unattended. Add a small splash of hot water or stock if it becomes dry before the ingredients are tender.
6. Cook gently and finish the sauce
A braise should bubble quietly rather than boil fiercely. On the hob, look for occasional gentle bubbles around the edges. If using an oven, follow a tested recipe and the cookware instructions rather than assuming every dish needs the same temperature.
Once the main ingredients are ready, assess the sauce. If it is too thin, lift out delicate ingredients and simmer the liquid uncovered. If it is too concentrated, loosen it with a little water. Taste again before serving, adding herbs, acidity or seasoning as needed.
Which ingredients are good for braising?
Cabbage, fennel, leeks, carrots and celery are useful vegetables to experiment with. Their structure gives them something to gain from a slower cooking method. Keep pieces substantial enough to remain identifiable, especially when you want to serve the dish as a centrepiece rather than a soft mixture.
Mushrooms are excellent for a quicker braise. Browning them first adds flavour, then a shorter covered cooking stage allows them to mingle with beans, onions and stock. Tinned beans are particularly convenient because they are already cooked and mainly need warming through and time to absorb flavour.
If using dried beans, prepare them according to the packet instructions before incorporating them into a recipe that assumes cooked beans. They are not a direct substitute for tinned beans, and some varieties require specific preparation. Do not rely on a gentle braise to replace those instructions.
For meat, choose a tested recipe suited to the particular cut. A cut that benefits from long cooking will behave differently from a lean, quick-cooking piece. Cooking time, safe preparation and doneness all need to match the ingredient rather than a general rule borrowed from another dish.
Easy mushroom and butter bean braise
This vegetable-based braise is a useful first project because the ingredients are straightforward and the sauce is easy to adjust. It serves approximately four as a main meal with bread, mashed potatoes or rice. Allow around 15 minutes for preparation and 35 to 45 minutes for cooking, depending on your pan and hob.
Ingredients
- 2 tablespoons olive oil, plus a little extra if needed
- 500g mushrooms, halved or thickly sliced
- 1 large onion, finely sliced
- 2 medium carrots, cut into small pieces
- 3 garlic cloves, finely chopped
- 1 tablespoon tomato purée
- 1 teaspoon smoked paprika
- 1 teaspoon dried thyme, or a few fresh thyme sprigs
- 2 tins butter beans, approximately 400g each, drained and rinsed
- 300ml vegetable stock, with extra available if needed
- 1 bay leaf
- 1 teaspoon lemon juice, plus more to taste
- Black pepper and salt, to taste
- A small handful of chopped parsley, optional
Method
- Heat one tablespoon of oil in a wide, lidded pan over a moderate heat. Brown the mushrooms in two or three batches, adding a little more oil if necessary. Transfer them to a plate as they develop colour.
- Add the remaining oil, onion and carrots. Reduce the heat slightly and cook for around eight to ten minutes, stirring occasionally, until the onion has softened.
- Stir in the garlic, tomato purée, smoked paprika and thyme. Cook briefly, stirring, until fragrant. Do not allow the garlic or spices to scorch.
- Pour in a small splash of stock and loosen the browned residue from the base. Return the mushrooms to the pan, then add the butter beans, bay leaf and remaining stock.
- Bring to a gentle simmer. Cover and cook over a low heat for around 15 to 20 minutes, checking and stirring gently as needed, until the carrots are tender. Add a splash of water if the pan is becoming dry.
- Remove the lid and simmer for a few minutes if the sauce needs thickening. For a creamier texture, mash a spoonful of the beans against the side of the pan and stir them back through.
- Remove the bay leaf and any woody thyme stems. Add lemon juice, taste and adjust the seasoning. Scatter with parsley if using, then serve.
The finishing lemon juice is worth tasting carefully. The goal is not a sharp, lemon-flavoured sauce but a little brightness to balance the beans and mushrooms. Add it gradually, especially if your stock already has a pronounced flavour.
How to build flavour without making the sauce heavy
A rich braise does not need to be overloaded with cream, butter or strong stock. Start by browning well, softening the aromatics and using enough salt to bring the ingredients together. Then consider what is missing before adding more ingredients.
If the dish tastes flat, a small amount of acidity may help more than extra salt. Lemon juice, a little vinegar or tomatoes can provide that lift. If it tastes thin, reducing the sauce gently may be more effective than adding another stock cube.
Fresh herbs can also change the character of a finished dish. Parsley gives a clean finish, while thyme suits longer cooking. Add delicate herbs near the end so their flavour does not disappear into the sauce. Use what complements the meal rather than adding every herb in the cupboard.
Common braising mistakes and how to fix them
The sauce is watery
Too much starting liquid, a tightly covered pan and moisture-rich vegetables can all contribute. Remove the lid and let the sauce reduce gently once the ingredients are tender. Lift out anything fragile first so it does not fall apart while the liquid concentrates.
The bottom of the pan keeps catching
The heat may be too high, the burner may be too small for even heating or the liquid level may be too low. Lower the heat, check more frequently and add small amounts of liquid as needed. If the base has burnt, avoid scraping that burnt layer into the sauce.
The ingredients are soft but the flavour is dull
Texture alone does not guarantee flavour. Think back to the browning stage, then check seasoning and acidity. A little lemon juice and fresh parsley may rescue a vegetable braise more effectively than simmering it for another half hour.
Some vegetables are ready before others
Adjust the cut sizes next time, or add tender ingredients later. Dense carrots and delicate leaves should not always go into the pan together. For the current batch, remove cooked pieces if practical and return them once the slower ingredients have caught up.
What to serve with a braise
Choose a side that makes good use of the sauce. Mashed potatoes, rice, couscous or crusty bread all work, depending on the dish. For the mushroom and butter bean recipe, bread and a crisp green salad can be enough because the beans already provide substance.
Contrasting textures keep a soft, comforting meal interesting. A crunchy salad, toasted breadcrumbs or simply some freshly chopped herbs can help. You do not need three extra side dishes; one thoughtful addition often does more for the plate.
If you prefer roasted vegetables alongside your braise, our guide to roasting vegetables explains how to build colour and texture without ending up with a tray of steamed vegetables.
Planning ahead and storing portions
Braises can fit naturally into a more organised cooking routine because the sauce and main ingredients are already combined. Plan how much you need before starting and set aside suitable containers so leftovers do not become an afterthought when you finish eating.
Divide leftovers into manageable portions and follow current food-safety guidance for cooling, refrigeration, freezing and reheating. Avoid leaving a large covered pot sitting out for an extended period. Label stored portions with the contents and date so they are easy to identify later.
Culivra's Glass Meal Prep Containers are worth browsing if you are organising individual portions. Check the product's care instructions before changing temperatures or using any container or lid for reheating. A storage container is not automatically suitable for every heating method.
For a lighter meal built around similar ingredients, you can also explore our homemade soup guide. It offers another practical way to turn vegetables and cupboard ingredients into a satisfying dinner.
Frequently asked questions about braising
Can you braise without an oven?
Yes. A covered pan on the hob works well for many braises. Maintain a gentle simmer, use a burner suited to the pan and check the liquid level periodically. Rotate or stir ingredients where the recipe calls for it to help them cook evenly.
Should the lid be on or off?
The lid is usually on during the main cooking stage to retain moisture. Removing it towards the end can help reduce the sauce. A loose-fitting lid allows more evaporation, so you may need to check the pan more often and top up the liquid.
Do you have to brown ingredients first?
Not always. Some recipes deliberately use a gentler approach, particularly with delicate vegetables. However, browning is useful when you want a deeper, savoury flavour. Follow the character of the dish rather than treating dark colour as a requirement for everything.
Can you use water instead of stock?
Yes. Water lets the other ingredients take the lead and can work particularly well when the pan already contains browned vegetables, herbs and a good flavour base. Taste at the end and adjust thoughtfully rather than assuming more concentrated stock is always better.
Why has my braise dried out?
The heat may have been too high, the lid may have allowed steam to escape or the pan may have been too wide for the quantity. Add a little hot liquid if the food is not burnt, lower the heat and continue gently. Check sooner next time.
Make braising part of your everyday cooking
The most useful lesson in braising is not a fixed cooking time or an exact depth of stock. It is learning to recognise what the pan needs: enough heat to cook gently, enough liquid to stay moist and enough time for the ingredients to become tender.
Start with the mushroom and butter bean recipe, notice how the sauce changes with the lid on and off, and taste before making adjustments. Once those habits feel familiar, the same approach can help you cook cabbage, leeks and other comforting dishes with more confidence. Good everyday cooking often comes down to a few dependable techniques used well.

Leave a comment
This site is protected by hCaptcha and the hCaptcha Privacy Policy and Terms of Service apply.